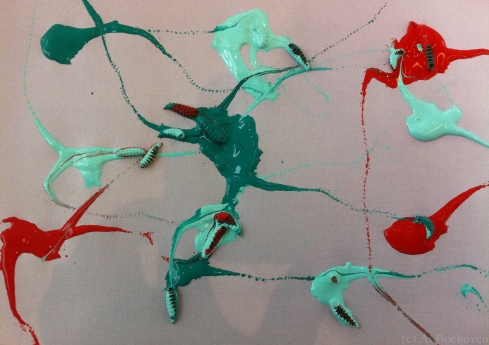
Painting with bugs:
Maggot art as an outreach activity
We set up a maggot art booth at an outreach event this weekend and it was a ton of fun. It made such a great public education opportunity I thought I’d take a moment to share some tips and tricks for other people who are interested in employing these little artists.
Maggot art makes a nice item to sell or give away at events, and it also provides a fun, hands-on outreach opportunity that people of all ages can enjoy. It’s great to watch people go from “Ew!” to “Ooh!” as they see a disfavored insect make something pretty and interesting. Don’t forget to talk to people about the role of maggots in the ecosystem, the life cycle of flies, and the usefulness of maggots in cleaning wounds. The maggot artwork also makes for a nice souvenir to take home, and hopefully encourage people to talk about what they learned with even more people.
You will need:
- late instar maggots
- tempera paint
- paper
- tray or box
- soft forceps
- water
- paper towels
- gloves
Step 1: Acquire maggots.
These are Chrysomya rufifacies, the hairy maggot blow fly, which were provided for the event by the forensic entomology lab on our campus. (Many, many thanks to Dr. Jeff Tomberlin and Meaghan Pimsler.) These maggots, which were raised on cow liver and smell positively lovely, made especially good artists because their eponymous hairs cause them to leave very attractive dotted paint trails, instead of the more typical lines.
Step 2: Acquire paint.
Small plastic cups or an egg carton make great little mini pools for the maggots to pick up their individual colors. The best paint for this is tempera paint, because it is water soluble and non-toxic. It also looks beautiful on the paper. We’ve also used acrylic paints and had the maggots do fine after, but since acrylics release small amounts of ammonia and formaldehyde as they dry this is less insect and child-friendly.
Step 3: Let the maggots express their artistic sensibilities.
Using tweezers (or your fingers if you’re lazy like me) drop paint-coated maggots onto the canvas. In our case, the canvases were half or quarter sheets of colored papers, placed in a plastic tray to contain wandering artists. We let visitors to our booth direct their own masterpieces, choosing paper color, three colors of paint, and pointing out where each little maggot should go. The more adventurous can also take tweezers in hand and distribute the maggots themselves. Maggots that wandered off the canvas could be picked up and placed back into spots of paint to continue their work.
Step 4: Experiment!
Every scientist knows that any mad science project must include experimentation. Mix things up with different colors of brightly colored paper. Apply the maggots in groups, or with more or less paint on them. Swirl paint colors together. I’ve attempted to teach the maggots to spell out my name, but they refuse to compromise their artistic integrity.
You can also apply the paint to the paper first, and then let groups of maggots explore the canvas and spread the paint around (see above). Or try painting a shape with a thick layer of paint and allow the maggots to make trails off of it. (A heart for Valentine’s Day might be a nice touch.) Fold the paper in half and decorate the fronts of cards so you can send your maggots’ masterpiece to your loved ones and enjoy their gasps of delight. (My family just looked at me weird, but I think they’re warming up to the idea.)
Step 5: Tip the artist(s)
When the artwork is complete to the satisfaction of yourself and your maggots, recover all your artists. Make sure to give them a good rinse in clean water before the paint dries. A squirt bottle works especially well to help loosen any stubborn paint. Put your maggots in a container with some paper towels or substrate to help them dry. When the day is done, give them a little extra food and let them finish their development into beautiful adult flies. As long as the paint isn’t left to dry they will do fine, with no worse fate than an unusually exciting day. I like to consider this an enrichment activity.
Step 6: Treasure your new masterpieces.
I framed mine.
—
Back to the techniques section.


Leave a comment